Showing posts with label perfectly pleated clutch. Show all posts

Tuesday, June 7, 2011

May winner!

So sorry for not announcing this yesterday like I said I would, things have been a little nuts around here! So I'll keep this short & sweet.

The winner of the great bag & keyfob from Bree at B Sew Crafty

may giveaway

as chosen by Mr. Random

winner

which just happens to be

'Perfectly Pleated Clutch'

from Nellie's Niceties! Congratulations! Please send me an e-mail with your contact info so you can get your prize.

I'll warn you now, it's going to be a quiet week around here, but I should be able to share the secret project next week!

Until next time...

Tuesday, May 31, 2011

Time to share YOUR Perfectly Pleated Clutch

Will somebody please tell me where May went? Please? I can't believe tomorrow is already June! Please tell me I'm not the only one.

The time has come to link up to your Perfectly Pleated Clutches. I know there are some beautiful ones out there, and just like every month, I can't wait to see what everybody has to share.

Each link will be your entry to win this great set from Bree at B Sew Crafty.

may giveaway

I think you already know the drill by now, but hopefully we've got some new people this month! As always, only links entered below will be considered for the giveaway drawing, not links entered as comments. You may enter more than once ONLY if you completed more than one bag, and each bag must be in its own blog post or Flickr photo & have its own link below. Please remember to link to your specific blog post or Flickr photo, not the main page on your blog or your Flickr profile.

Also, I know some of you didn't do the pleats for this one - NO WORRIES! :) Link up anyways, I want to see what you've made. I'm certainly not going to hold it against you if you made the pattern work best for you. :)

Entries will be open through midnight this Friday, June 3. The winner will be announced Monday, June 6.


Until next time...

Thursday, May 19, 2011

Perfectly Pleated Clutch: Inspiration

Time for our monthly inspiration! You've still got plenty of time to work on your clutch if you haven't started yet, I promise you it doesn't take as much time as it looks. Really, the most time-consuming part is making the pleats, but you can do that in small batches when you've got a few minutes.

And remember, you will not need the crazy amount of fabric called for in the pattern. Yes, the pleats do take quite a bit of fabric for the size of clutch you end up with, but nowhere near what's called for. And trust me, it's super easy to hide a seam in the pleats, so you can easily piece together smaller lengths of fabric to get the full length.

Here's mine again. Remember, I pieced together three fat quarters for my panels (cut into 8" widths for the small clutch).

Perfectly Pleated Clutch

I love the way this fabric looks when it's pleated on this clutch from SewCraftyJess. I wish mine had a little more random look like her's.

Amy Butler Perfectly Pleated Clutch

Absolutely loving the bright colors on this one from Marci.

Perfectly Pleated Clutch Front

I mentioned this non-pleated version from Nellie's Niceties earlier this week, but just incase you missed it, keep in mind this is absolutely an option!

'Perfectly Pleated Clutch'

Another bright & fun (non-pleated) version from simplybeu, and the flower is a perfect addition!

Perfectly Pleated Clutch

The batik on this one from Fried Okra looks fantastic pleated & those yo-yos are just adorable!

Perfectly Pleated Pouch - May

Lookin' good! Remember to share your pictures and ask any questions you might have in the Flickr group. I look forward to seeing more of your clutches!

Until next time...

Monday, May 16, 2011

May Giveaway from B Sew Crafty

This month's giveaway is sponsored by Bree at B Sew Crafty. Bree is the very first fellow bloggerI "met" last year when I started this little adventure. Make sure you check out her Etsy shop & blog.

Bree has made this great Keyka Lou Sweetheart shopper & matching key fob from Anna Maria Horner, Innocent Crush, First Impression in Potpourri for the exterior of the bag & Anna Maria Horner, Innocent Crush, Shattered in Punch for the interior of the bag.

May Giveaway

May Giveaway

May Giveaway

May Giveaway

Once again (or should I say, as usual) I'm totally jealous that I can't win my own giveaway! Get to work on your Perfectly Pleated Clutch (or non-pleated, like this great one from Nellie's Niceties!) so you'll have a chance to win! I'll have your inspiration post up later this week or early next week, so get your pictures uploaded to the Flickr group for your chance to be included. There are some gorgeous ones out there already!

Until next time...

Thursday, May 5, 2011

Perfectly Pleated Clutch: Completed!

Wait, what?! Is it the end of May already? NOPE! I just didn't procrastinate this month & actually managed to get done at the beginning of the month. What a novel concept. :)

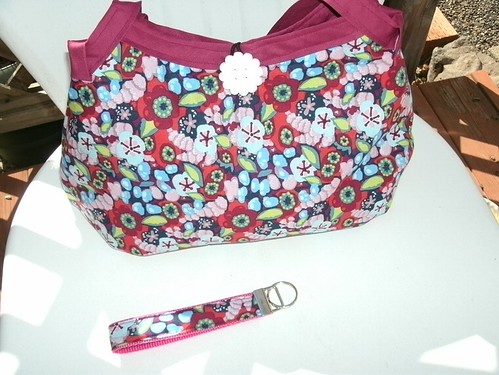
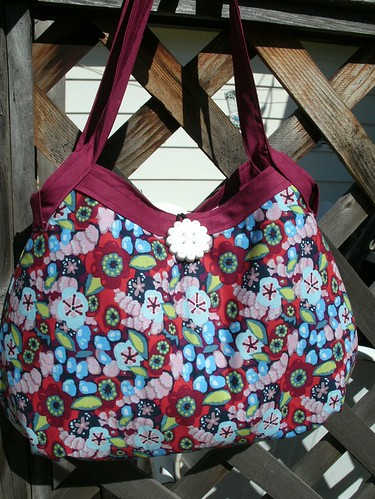
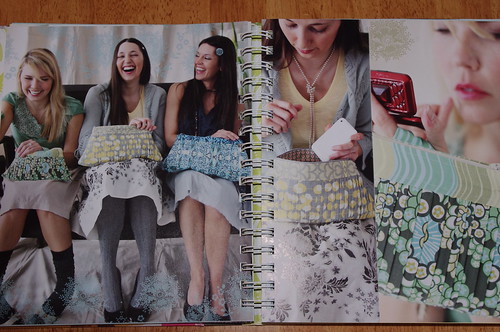
I said it before, and I'll admit it again now, I was not excited about this project when I first got the book. There were only a couple patterns in the book I didn't particularly like, and probably wouldn't have made them if not for the sew along. But let me say now, I'm so glad I did. I love it!

Perfectly Pleated Clutch

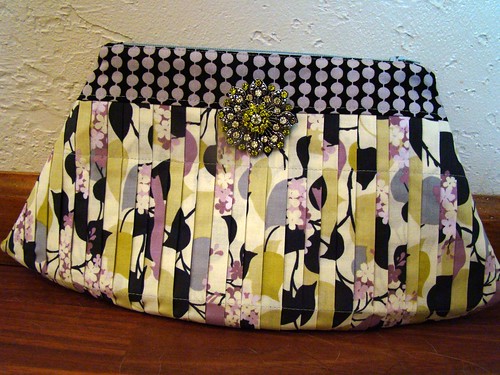
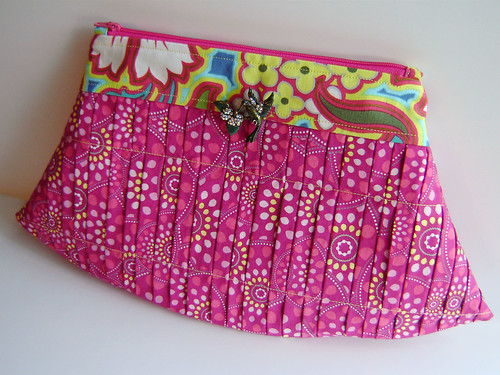
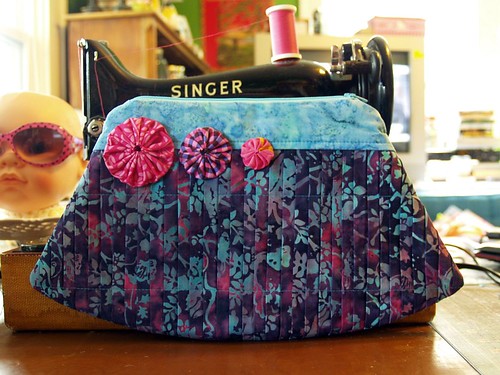
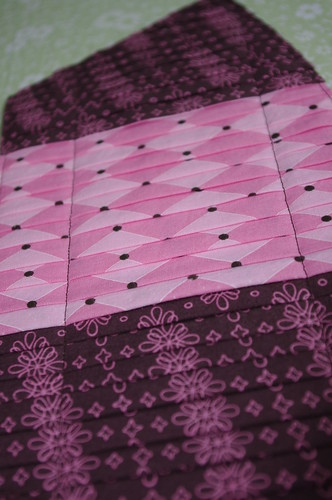
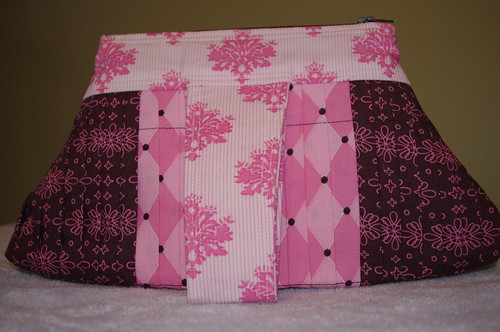
When I was first thinking about working on this one, I considered skipping the pleats, and just using the basic pattern for a clutch. I think that's still a great alternative if you don't like the pleats, or don't want to use that much fabric, but in the end I'm glad I stuck with the pleats. The clutch would still be cute without them, but I think the pleats add a lot to the design & take it up a notch from your basic clutch.

Amy Butler:  Perfectly Pleated Clutch
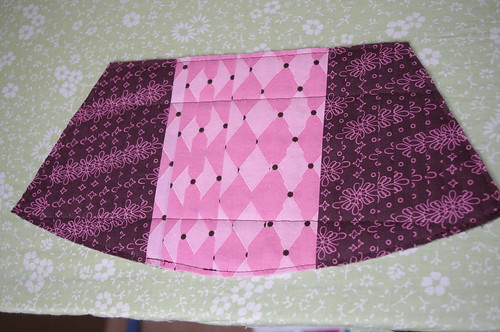
... sorry to share this again, I just love this shot of the pleats :) ...

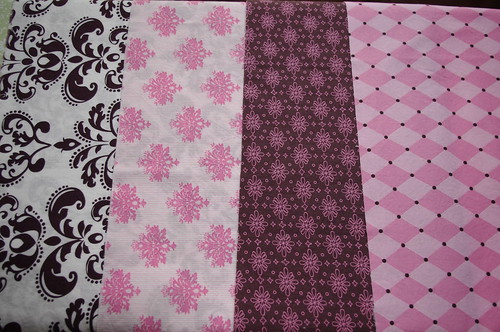
Speaking of the fabric requirements for this, remember when I told you not to freak out about it? I'll stand by that. I have 
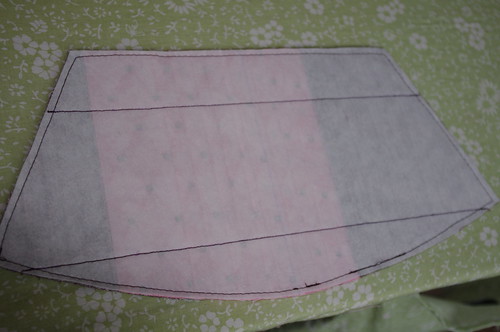
significant scraps left over from my six fat quarters, especially the fabric I used for the lining, handle, & band. The pleats use the most by far, but I've still got some decent sized usable pieces left from that. Had I not wanted to center the pink, I could have easily gotten each piece out of two fat quarters rather than three. Also, I used two fat quarters for the lining & pocket, but could have gotten all the pieces except one pocket piece on one fat quarter if I hadn't been fussy cutting on directional fabric. Obviously you'll use a bit more if you make the medium or large clutches, but I'm still guessing not nearly as much as called for in the book.

I only made minimal changes while making this, and overall I think the pattern is actually pretty good as written. Just like last time, I didn't see the need to baste the pocket pieces together before basting it onto the lining.
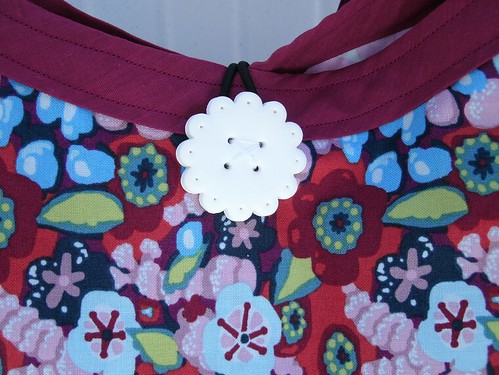
I did listen to Marci (her clutch should be up sometime next week) when she suggested adding an inch or two to the length of the strap since it was tight on her wrist. I just put the pattern piece about a half inch away from the folded edge & continued the line of the piece, essentially adding an inch of length. I think it's perfect - it slips on easily, but still won't fall right off.

Perfectly Pleated Clutch

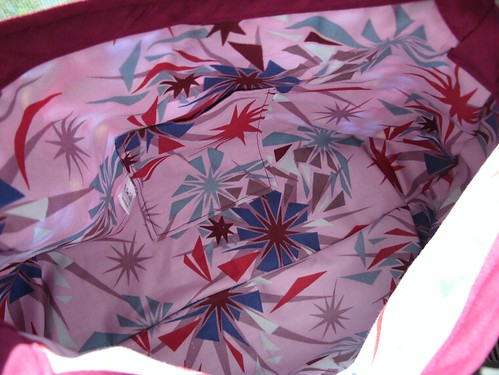
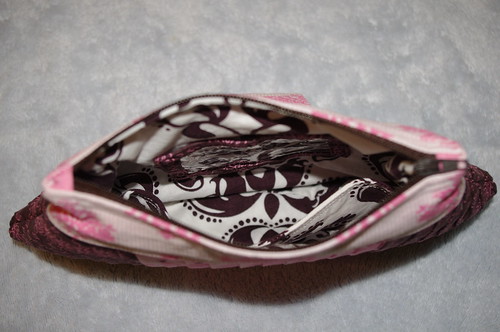
I didn't use the separate band on the lining side - I didn't see much point since I was going to be using the same fabric & it would just add an unnecessary seam & bulk. Instead, I just traced around the exterior piece after I added the band to it. It worked well, and I'm glad to have the lining as all one piece. The only thing is I wish I would have trimmed about a quarter inch off the lining piece all around (tapered from the top so the width at the top stays the same since the width at the zipper needs to match the exterior), or at the very least trimmed out most of the seam allowance after sewing the lining pieces together. Since the lining is the exact same size as the exterior, it's just a smidge too big & doesn't sit quite as nice as I would like on the inside. Usually when I make bags where you sew the exterior together, sew the lining together, then attach them together at the top, I'll just sew an 1/8" larger seam allowance in the lining so it's just a touch smaller than the exterior. That way when it's inside the bag, there's less bulk. It's not a big deal, but just something to think about.

Perfectly Pleated Clutch

I did the zipper completely different than called for in the pattern. I'm never quite happy with how the ends of the zipper look when it's sewn directly into the seam allowance. I can just never get it lined up right so it looks pretty. Instead, I went with a covered-end zipper, and I'm absolutely loving how it turned out.

Perfectly Pleated Clutch

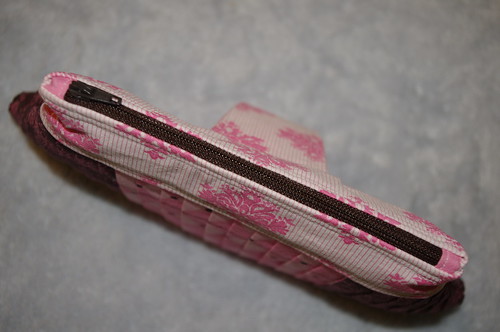
The zip ends even add a nice little touch to the top. To do this, I cut my zipper to 7" (remember, I made the small clutch!), but if I did it again, I'd probably go down to 6.5" to give myself a bit more room for the seams on either side, but I'll explain that in a minute. For the zip ends, I took a scrap of fabric just a bit wider than the zipper & 1 1/4" long. Fold & press in half (wrong sides together), then fold the ends in to meet the fold you just made. Basically you're making double-fold bias tape. Sew one to each end of the zipper, creating your new stops. When you're ready to put it all together with the zipper, instead of placing it like it says in the book, just center the zip along the top edge of your lining piece. You will have a space left at either end of the zipper - this is your seam allowance. You will not be sewing over the zip ends you created, only through the fabric that's beyond the zipper. I only left myself 1/4" on each end, planning to taper from a 1/4" seam by the zipper to the 1/2" seam called for in the pattern for the rest of the clutch. It was a really tight fit getting my foot into that little space though, which is why I recommend making your zipper a full inch less than the measurement of the top of the clutch (I only did 1/2" less). You still probably won't be able to actually make the 1/2" seam allowance right by the zipper, but it'll be much easier to sew. So basically, you aren't sewing the ends of your zipper in at all, but since you covered them with the fabric, it will still look & lay nice but not bulk up your seam.

I mentioned yesterday that I was working on adding an ID pocket to the lining, opposite the pocket called for in the pattern. As I was thinking about it, I decided I wanted to try out using bias tape around the plastic, rather than trying to cut a piece of fabric with a window in it. It actually worked really well, so I went that route. Basically I just wrapped the bias tape around a piece of plastic cut about 1/8" bigger (on all sides) than a driver's license or credit card, mitering the corners like you would if you were binding a quilt. It's not perfect where the ends meet since I was really struggling with that, but overall, I think it turned out pretty good.

ID pocket

The plastic I was using (cut from one of those bags comforters or sheets come in) was a bit old & wrinkly, so I decided to see if I could iron it a bit to smooth it out. It turns out you can iron it to be pretty smooth, just make sure (obviously) that you put the piece under another piece of fabric & don't iron directly on the plastic. And, uh, I also recommend turning your iron down to a cool setting, not the cotton/linen setting. Otherwise you end up with a hot blob of soft plastic. Not that I know from personal experience or anything - she said, dripping in sarcasm & melty fingertips. ;) Seriously though, that stuff gets hot, so be careful!

I didn't get very good pictures of it, but the only other change I made was to do a double-line of stitching everywhere I top stitched other than across the pleats - on both the top & bottom of the band & along the sides of the handle. It wasn't necessary, but I think it adds a nice finished touch.

Perfectly Pleated Clutch

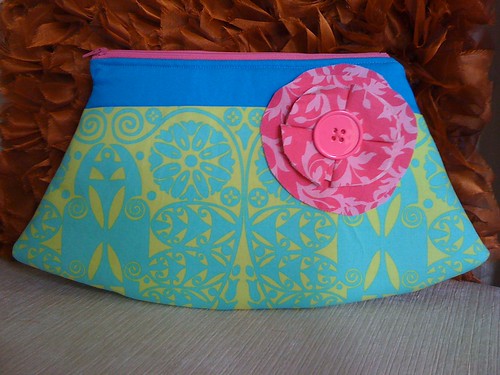
Overall, I'm really happy with how this turned out & can't wait to give it to the new mama! And I can't wait to see yours!

Until next time...

Sunday, May 1, 2011

Perfectly Pleated Clutch: the pleats

I told you I was excited to get started on this one! The funny thing is, this was probably one of the lowest on my list of what I was looking forward to in the book when I first got it. But for some reason, over the past week or so I've started really looking forward to making this one. Not necessarily because I want it for myself, pleats still aren't exactly my thing, but I've not done anything with pleats before & it's always fun to try something new. And I've got to say, the pleats are really growing on me, so maybe I will end up keeping this one for myself!

IMGP0061

As I said before, I decided to use a few fat quarters pieced together to make my pleats. It worked out perfectly, and as I suspected, three fat quarters sewn together were more than enough length-wise for the small clutch.

My biggest tip for working on the pleats, especially if you've never done them before (I hadn't!) is to have patience & take your time. As long as you're fabric can handle it (I'm using quilting cotton), use a high temp & lots of steam! It's also easiest to make the next pleat while your fabric is still warm (ummm...okay...hot) from pressing the last pleat. Be careful you don't burn yourself, but try not to let the fabric cool too much between pleats.

IMGP0108

Also, I started out working towards myself on the ironing board, but quickly realized that I wouldn't have enough space to pleat the entire piece. I had to turn the piece when it was about 6 inches long, and let me tell you - it's not easy to move a pleated piece of fabric! When I started the second piece, I did about three pleats working towards myself, then turned it lengthwise on the ironing board. It was much easier to get the pleats lined back up & keep working. It really was easiest for me to get it started even while it was facing me, but you can certainly just start out working it lengthwise on the ironing board.

When it comes time to iron on your interfacing (it'll already be cut out from the pattern piece), you'll need to flip the pleated piece over. Like I said before, it's not easy to move pleats, and it's a lot to pin each & every pleat. I used my quilting rulers, sliding one under the pleated fabric & used another on top to flip it over. Then just slide the bottom one back out after you get it flipped.

When you baste the interfacing to the pleated fabric (after you've ironed it into place), make sure you're moving your fabric through your machine with the pleats. After you do one side, you'll want to start new again on the opposite side (don't just stitch all the way around) so you're not working against the pleats. If you do try to sew against the pleats (remember, you'll be sewing on the interfacing side), it's easy for them to get flipped & sewn going the wrong direction. At first I just worked my way around the piece like I normally would, but found some of my pleats getting pushed the wrong direction. When I stopped & flipped it over, more than I had realized had flipped, so I had to rip out part of the seam & resew over those spots. It's all in your seam allowance though, so you won't see any of the basting stitches if they're messy (mine sure are!).

IMGP0112

Keep the same thing in mind when sewing your straight lines that will hold down the pleats. I had to start from the same side for both lines, while normally I would have sewn down one line, turned it & came back the opposite direction for the second line.

After you get the pleats sewn down, trim the extra pleated fabric from around the interfacing, then start all over again for your second pleated panel!

IMGP0111

Good luck with your pleats, I promise they're much easier than they look once you get the hang of it!

Until next time...

May: Perfectly Pleated Clutch

I know some of you who are really excited about this month's project, the Perfectly Pleated Clutch, and I've got to say, I am too! This is one of the ones I wasn't looking forward to as much as some of the others, but when I got looking at the pattern this week & thinking about what fabrics I'll use, I actually got really excited to start working on it.

IMGP0060

Speaking of fabric for the clutch, don't freak out when you see the requirements! I did at first - almost two yards of exterior fabric for a clutch?! Yikes! My goal is to make everything in the book from my stash, unless I want something specific for a gift, and I know I don't have any two-yard cuts just laying around! But, when I got to looking at the actual measurements for the pleated pieces (two pieces 8"x54" for the small clutch), I realized I can put together three fat quarters (approx 18x20) and have plenty of fabric for both exterior pieces of my clutch. And once I realized that, I knew exactly what fabric I wanted to use!

IMGP0107

I picked up this fat quarter set at JoAnn's sometime last spring or summer for just a couple of the prints & have a fair amount of it left over. I'm using three fat quarters for the exterior, one for the band & handle, and another two for the interior & pockets - and still have a decent amount of fabric left over! So seriously, don't freak out about the amount of fabric this calls for.

This month's giveaway is sponsored by Bree at B Sew Crafty. Bree is one of the first people I "met" in the blogging world, and has become a great friend of mine. She makes beautiful purses, just had to sew 87 java sleeves (yes, 87!), and is starting to list a ton of fun kids stuff in her Etsy shop. Bree is making a Sweetheart Shopper & matching key fob for this month's winner.

may giveaway

Needless to say, I'll be pretty jealous of this month's winner, again! Yes, I know I've said that pretty much every month, but it's the truth!

Be sure to check out the Flickr group to share your photos of fabric you'll be using, your progress, or completed clutch & don't be afraid to ask if you've got any questions! Everybody has been so nice & helpful so far.

IMGP0061

Remember, it's still not too late to enter your Beautiful Balance Checkbook Cover to win the April prize. Head over to link up for your chance to win!

Until next time...