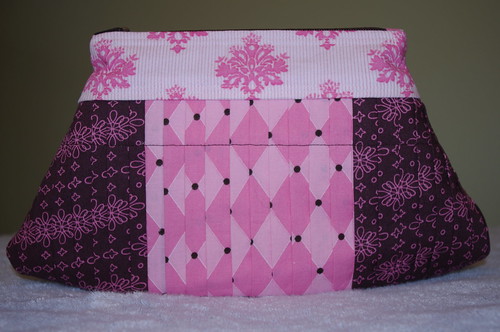
I said it before, and I'll admit it again now, I was not excited about this project when I first got the book. There were only a couple patterns in the book I didn't particularly like, and probably wouldn't have made them if not for the sew along. But let me say now, I'm so glad I did. I love it!
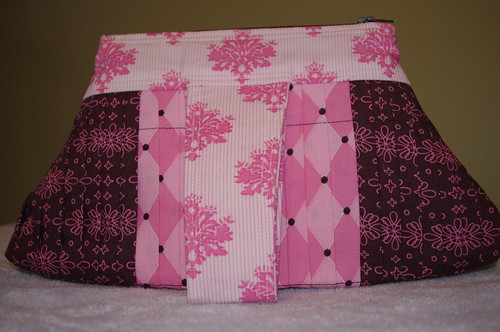
When I was first thinking about working on this one, I considered skipping the pleats, and just using the basic pattern for a clutch. I think that's still a great alternative if you don't like the pleats, or don't want to use that much fabric, but in the end I'm glad I stuck with the pleats. The clutch would still be cute without them, but I think the pleats add a lot to the design & take it up a notch from your basic clutch.
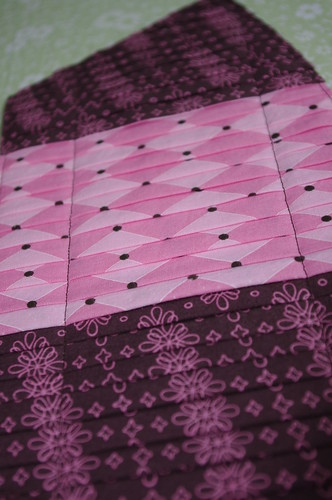
... sorry to share this again, I just love this shot of the pleats :) ...
Speaking of the fabric requirements for this, remember when I told you not to freak out about it? I'll stand by that. I have significant scraps left over from my six fat quarters, especially the fabric I used for the lining, handle, & band. The pleats use the most by far, but I've still got some decent sized usable pieces left from that. Had I not wanted to center the pink, I could have easily gotten each piece out of two fat quarters rather than three. Also, I used two fat quarters for the lining & pocket, but could have gotten all the pieces except one pocket piece on one fat quarter if I hadn't been fussy cutting on directional fabric. Obviously you'll use a bit more if you make the medium or large clutches, but I'm still guessing not nearly as much as called for in the book.
I only made minimal changes while making this, and overall I think the pattern is actually pretty good as written. Just like last time, I didn't see the need to baste the pocket pieces together before basting it onto the lining.
I did listen to Marci (her clutch should be up sometime next week) when she suggested adding an inch or two to the length of the strap since it was tight on her wrist. I just put the pattern piece about a half inch away from the folded edge & continued the line of the piece, essentially adding an inch of length. I think it's perfect - it slips on easily, but still won't fall right off.
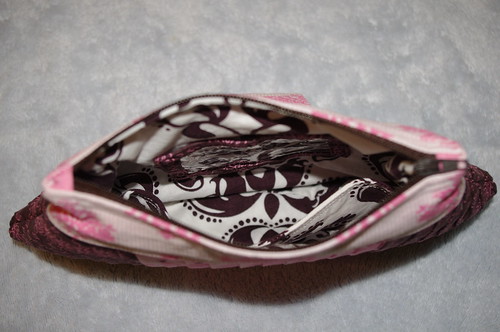
I didn't use the separate band on the lining side - I didn't see much point since I was going to be using the same fabric & it would just add an unnecessary seam & bulk. Instead, I just traced around the exterior piece after I added the band to it. It worked well, and I'm glad to have the lining as all one piece. The only thing is I wish I would have trimmed about a quarter inch off the lining piece all around (tapered from the top so the width at the top stays the same since the width at the zipper needs to match the exterior), or at the very least trimmed out most of the seam allowance after sewing the lining pieces together. Since the lining is the exact same size as the exterior, it's just a smidge too big & doesn't sit quite as nice as I would like on the inside. Usually when I make bags where you sew the exterior together, sew the lining together, then attach them together at the top, I'll just sew an 1/8" larger seam allowance in the lining so it's just a touch smaller than the exterior. That way when it's inside the bag, there's less bulk. It's not a big deal, but just something to think about.
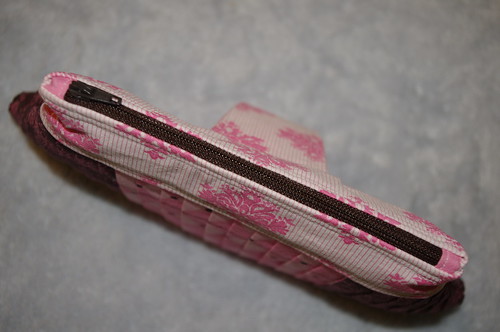
I did the zipper completely different than called for in the pattern. I'm never quite happy with how the ends of the zipper look when it's sewn directly into the seam allowance. I can just never get it lined up right so it looks pretty. Instead, I went with a covered-end zipper, and I'm absolutely loving how it turned out.
The zip ends even add a nice little touch to the top. To do this, I cut my zipper to 7" (remember, I made the small clutch!), but if I did it again, I'd probably go down to 6.5" to give myself a bit more room for the seams on either side, but I'll explain that in a minute. For the zip ends, I took a scrap of fabric just a bit wider than the zipper & 1 1/4" long. Fold & press in half (wrong sides together), then fold the ends in to meet the fold you just made. Basically you're making double-fold bias tape. Sew one to each end of the zipper, creating your new stops. When you're ready to put it all together with the zipper, instead of placing it like it says in the book, just center the zip along the top edge of your lining piece. You will have a space left at either end of the zipper - this is your seam allowance. You will not be sewing over the zip ends you created, only through the fabric that's beyond the zipper. I only left myself 1/4" on each end, planning to taper from a 1/4" seam by the zipper to the 1/2" seam called for in the pattern for the rest of the clutch. It was a really tight fit getting my foot into that little space though, which is why I recommend making your zipper a full inch less than the measurement of the top of the clutch (I only did 1/2" less). You still probably won't be able to actually make the 1/2" seam allowance right by the zipper, but it'll be much easier to sew. So basically, you aren't sewing the ends of your zipper in at all, but since you covered them with the fabric, it will still look & lay nice but not bulk up your seam.
I mentioned yesterday that I was working on adding an ID pocket to the lining, opposite the pocket called for in the pattern. As I was thinking about it, I decided I wanted to try out using bias tape around the plastic, rather than trying to cut a piece of fabric with a window in it. It actually worked really well, so I went that route. Basically I just wrapped the bias tape around a piece of plastic cut about 1/8" bigger (on all sides) than a driver's license or credit card, mitering the corners like you would if you were binding a quilt. It's not perfect where the ends meet since I was really struggling with that, but overall, I think it turned out pretty good.
The plastic I was using (cut from one of those bags comforters or sheets come in) was a bit old & wrinkly, so I decided to see if I could iron it a bit to smooth it out. It turns out you can iron it to be pretty smooth, just make sure (obviously) that you put the piece under another piece of fabric & don't iron directly on the plastic. And, uh, I also recommend turning your iron down to a cool setting, not the cotton/linen setting. Otherwise you end up with a hot blob of soft plastic. Not that I know from personal experience or anything - she said, dripping in sarcasm & melty fingertips. ;) Seriously though, that stuff gets hot, so be careful!
I didn't get very good pictures of it, but the only other change I made was to do a double-line of stitching everywhere I top stitched other than across the pleats - on both the top & bottom of the band & along the sides of the handle. It wasn't necessary, but I think it adds a nice finished touch.
Overall, I'm really happy with how this turned out & can't wait to give it to the new mama! And I can't wait to see yours!
Until next time...



LOVE it! I'm so glad you're also happy with the pattern. I'll admit that the thought did cross my mind to omit the pleats and use the pattern shape to make a regular clutch but you've definitely inspired us with this gem. Thanks for all of the helpful tips too. I think I'll copy you and add zipper tabs as the one time I made a bag like that it looked so nice and neat. Makes me wonder why the book doesn't recommend that method.
ReplyDeleteWow, finished already? The end result looks very nice, I like the double top stitching. That will make a very nice gift!
ReplyDeleteI'm a sucker for ANYTHING pleated :) it looks fantastic!
ReplyDeleteDouble top-stitching is a great tip! And I'm diggin' the zipper - that's how I do mine, and I really think it makes things look so much more professional.
ReplyDeleteGorgeous!!! I still need to start mine. I feel a bit intimidated by this one!
ReplyDeleteGreat job Bree! It looks beautiful. I'm hoping to try this over the weekend :)
ReplyDeleteVery cute! Congrats on getting it done so fast, and doing such a great job and sharing so many details. I'm still staring at my stash and pondering fabric choices (and wondering when I'm going to get a checkbook cover done!).
ReplyDeleteI'm actually joining back in this month. I haven't been on track since the Cosmo... i have my pleated front done and I think I'm going to go with a plain back, no pockets on the inside and I'm contemplating a thin strap on the end instead of that weird thick thing in the middle. Very helpful tips!
ReplyDeleteIt looks beautiful Bree! Thanks so much for linking back to me, and I am so glad that you liked your strap better a little bit longer! Your zipper looks so crisp and well finished. Great job and congrats on getting it done so early!
ReplyDeleteLove, love, love your zipper method! Much better looking - and easier to use!
ReplyDeleteI'm now inspired to finish my bag. Thank you!