It all started out innocently enough, I got my pieces all nice & pinned to do these pretty little blocks in the center of the first round.
Easy enough, right? I thought it should be! I got my pieces pinned on & sewed them down, then turned it over and found this:
I think I cried a little inside. I can't remember at that point (a lot has happened since then!), but I don't think I knew anything was wrong as I was sewing, so it was quite a surprise to see. I fiddled around with my machine for a while, trying to figure out what the issue could be. I can't remember if it was before or after this that the bobbin casing accidentally got put in funny, and the whole thing jammed. But I got that put back in correctly, and all seemed to be fine. Then at one point I checked the backside again to make sure everything was going together correctly to find that my tension was way screwy. Even now, I can't figure out what's really wrong with it, except that I have to keep the tension at an 8 ("normal" is 4, and it only goes up to 9), and it makes this horrible clunking sound with every stitch. I can't tell if the noise is coming from the bobbin or the part that moves the needle up & down, so I'm not even sure what to check. I've pulled off the plate covering the bobbin & pulled out the bobbin casing to make sure everything is (relatively) cleaned out & where it belongs. Everything looks okay, so I'm not certain what to do. I don't even know where to take it to have it checked & serviced since it's just a measly little cheap-o Brother machine. But it still sews fairly decent, even if it makes a racket, so I guess I'm just hoping it'll pull out of whatever is wrong. It's made funny noises before & seemingly fixed itself, so maybe I'm hoping for a miracle here...
Anyways, pity party over - sewing machine issues were only half my problems (although, I'm sure they didn't help the "operator error" issues), the other half was, well, just me I guess.
Like I said before, I had a hard time making a truly wonky block for Beth in March, and I was trying my best to keep this one perfectly square & even for Elizabeth. "Perfectly square & even" is HARD. Boy is it harder than I thought.
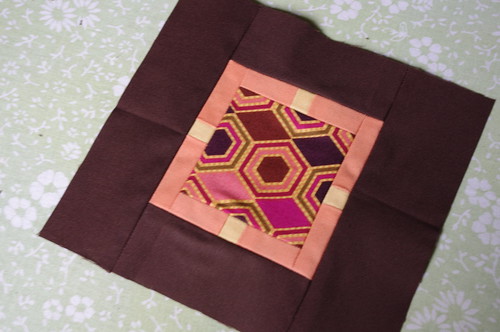
Let's start with this brown part here:
Looks pretty much perfectly square right now, huh? Let me tell you, it's not! After I sewed on the first two pieces, the other two sides were a smidge short. But too big of a smidge to just use them as they were ("smidge" is a technical quilting term, you didn't know that?). But I didn't want to cut two new pieces, even though Elizabeth sent plenty of fabric (thank you, Elizabeth, I love you for that!). I was trying to conserve as much as possible since she wanted scraps back to use to make more blocks. So I decided I'd just trim the sides (evenly on both sides - I was thinking, at least a little bit) and everything would be good. Except that I forgot to trim the width of the other two sides, so suddenly it was 1/4" wider one way than the other, but of course I didn't realize that until a few more rounds in. Doh.
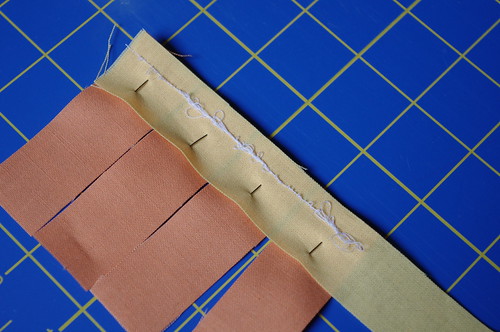
And then...then there was this:
I got all excited about piecing that bit in between the stripes of yellow. But somehow, somehow, it got curved. How in the world did it curve?! There should be the same amount of yellow along that full strip. ARGH! Obviously I didn't realize it right away. Of course. And, of course, when I was getting ready to sew the next piece on, that corner was sticking way out, so I trimmed it off. Didn't think "oh hey, maybe it's sticking out because there's a problem!" Nooooo...I wasn't thinking that clearly (remember, through all this my sewing machine is clunking away like an old-timey car), so of course by the time I realized there was a problem, I couldn't do much to fix it.
Out came my friend, the seam ripper. We're close. :)
I think I ended up ripping out & resewing the seams around that area (I got so frustrated I quit taking pictures - Bad Blogger!) at least five or six times. And once I finally got it fixed (eventually completely replaced the yellow strip I had trimmed), of course the other yellow piece (top piece in the picture above) was too short. Go figure. Too short by the amount of the seam allowance, so I hoped I could just put in a little piece (again, sorry for no pictures) that I thought the seam would pretty much fall right at the seam allowance so you wouldn't be able to see it. Do you think it worked out that way? Of course not! Out came my trust seam ripper again. We became the best of friends working on this block. :)
I put on another new piece of yellow, resewed all the seams around it that had been torn out for the 20th time. And, oh, how I wish I were exaggerating by a lot! And finally, finally it was happy.
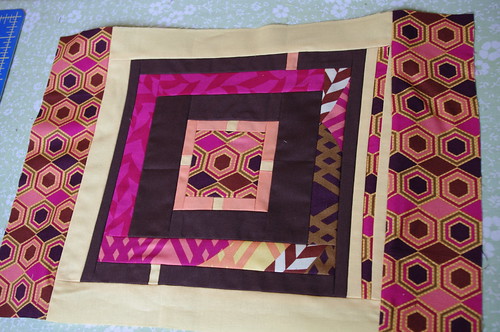
Just please don't look too closely at the back, it's a disaster area with all that piecing. And this thing is kind of a monster, about 15.5" square. As close to square as I could get it, at least, considering that little snafu I mentioned earlier. Can you see now how the two brown rounds aren't quite even all the way around? I totally meant for it to be that way. ;)
I hope Elizabeth likes it, in the end I definitely do. Even after all the blood, sweat, & tears, I think it ended up worth the work. Except, I think the one thing that amazingly didn't happen was to stab myself with a million pins. So no blood on this one. :)
Until next time...

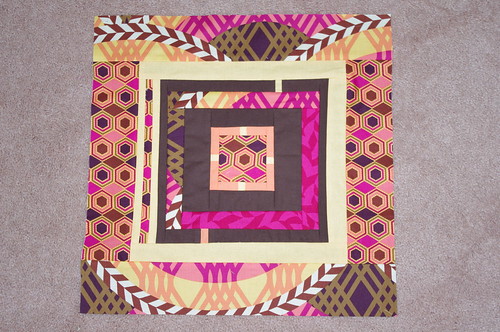
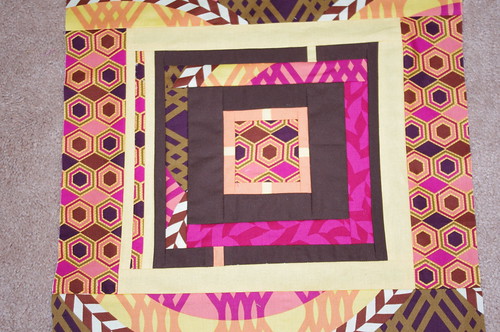
Well, yes, I definitely DO like it a lot - I love it!! It's perfect!!! Exactly what I was hoping for (aside from the piecing trouble, that is!). Thank you for taking so much time on this block and all the effort you put into it, it really shows. I adore this block :)
ReplyDeletelol - thanks for sharing your struggles! I've been having one of those weeks where nothing sewing wise is going right for me. It's nice to not feel alone in that! the block turned out fabulous, I really love it! And I love that outer fabric - the design make it look like curves are pieced in.
ReplyDeleteAlso - do you have a local brother dealer? Our bernina dealer also services brother. Getting it serviced will be cheaper than buying new one.
This looks stunning!
ReplyDeleteOK, I too have a cheapo Brother Machine from Walmart, and it did this exact same thing a few months ago....this is what I did....and it sounds super stupid, but it worked for me.
ReplyDelete1. Take your needle out and throw it away, I don't care if it is new, sometimes new needles have defects.
2. Clean the heck out of your machine, open it up, get out all that lint every bit! Oil it while it is open if you can.
3. Rethread it with a different bobbin and thread, like if you were using white, use blue. Because sometimes the bobbin itself can end up wound slightly wrong, or have gunk on it or something.
4. Set your tension back to how it should be and test it out. Sometimes you have to rethread it several times.
I did all of these several times and I have no more clacking noise and good tension. Can I explain it, no, it doesn't make sense. But it worked for me!
Oh and I forgot, the block looks great, I love that Swoon fabric in that style of block!
ReplyDeleteLovely results in spite of the headaches!
ReplyDeleteMy 2-cents:
1) Make sure your TOP thread is correctly seated at all points between spool and needle. Just 'cause the problem is on the underside doesn't mean it's a bobbin issue. When the tension goes all kerflooey and I get nests underneath like that, rethreading the top thread usually solves it.
2) If you think it's the bobbin, start over with a fresh one rather than trying to make a faulty bobbin work. When winding the bobbin make VERY sure the thread is securely passed through the tension thingie or the bobbin will wind too loosely.
3) Make sure the bobbin is inserted right way up. It does matter which way the thread pulls.
4) As MarciGirl said, a fresh needle can make a big difference. The clanking sound could be from a slightly bent needle.
Hope that helps!
Oh no! I hope your sewing machine doesn't need a trip to the doctor. When mine does that wonky sewing on the back it usually needs to be re-threaded. No idea why something would slip or change but that usually does the trick for me. Hope it's something similarly simple for you. Despite all of your difficulties I think your finished block looks great!
ReplyDeleteIt could be that the tension in your bobbin is off a bit too. Not to add more options of what could go wrong... but. lol. My machine seized up last week and for the life of me I could barely lift the needle out of the quilt I was working on. Four days later and the repair man tells me it's fine. Who knows what was wrong but it works now! :)
ReplyDeleteAnd the block is amazing!!!! I just had Elizabeth do this same block for me in another bee. I love love love them. Your planning ahead in the stylizing department really shows. I did this type block for my bee month too since I knew I'd never be able to (sanely) make 20 of them myself. I still ended up making about 10... and nearly went insane. But they're so worth it! :)
Bree, I think the block looks great! It is very difficult to get these things square. If the first round is just a micro-millimeter out of square, it makes every subsequent round a little less square. Good luck with your machine, I am technically inept so I can't give you much advice. When something's wrong with mine I just change the needle, change the bobbin, rethread, and hope for the best. : )
ReplyDeleteOh those blocks look amazing.
ReplyDeletelooks like you got some good advice already on the machine bit...My top reasons for that happening are
1) bad needle
2) top thread has popped out of the eye that bobs up and down.
3) bobbin thread isn't inserted right
4) there is a screw on your bobbin casing, you should be able to hold your thread and it should suspend by it's own weight.. if it falls you need to tighten that screw.
Best of luck!!!!