Come join in over at Sew, Mama, Sew for a Super Style Bag Swap! I've signed up & am super excited about it. I'm already thinking about what I want to make, even though I know I need to wait until the first to get my swap partner to discuss the important details. I'm definitely excited about this since I've seen other swaps around (hello I-Spy Quilts!), and this one is right up my alley. But you'd better hurry if you want to sign up, you have to do it by tomorrow (Wednesday)!
I do have the new Amy Butler book, Amy Butler's Style Stitches: 12 Easy Ways to 26 Wonderful Bags & am thinking about trying out one of the new patterns for this swap. There are some really cool bags in there (and a few styles that just aren't me), so I'm looking forward to trying them out.
I'll be sure to share what I make for the swap & what I receive in return.
And I have to give credit to Sourkraut over at Langes Fädchen, Faules Mädchen, where I found out about the swap. Thanks! And since I brought it up, make sure you go check out her fantastic Halloween bags (especially that last one. LOVE IT!). I've been thinking I may need one for myself, but somehow managed some self-restraint at the fabric store last week. And I really like these cute Doily Tanks which also sound super easy!
Until next time...

Tuesday, September 28, 2010
My first personal design
Well...if you could call it that. I don't know if I'd go so far as to call it a "design" or even really a pattern, and it's not like it's a ground-breaking idea that's never been done before. BUT...it is the first thing I've done so far that's not been from somebody else's pattern, so I'm pretty proud of it all the same. I may even do a tutorial about it at some point, but I'm sure anybody who's a better sewer than I am could take a look & figure it all out on their own. All the same, I still wanted to share. :)
This all came about because a friend sent me an e-mail last week that she wanted something similar to this Vera Bradley Mini Hipster purse, but with a few changes. So we played a bit of Twenty Questions (or so it seemed) so I could get a general idea of what she wanted. That Vera Bradley bag is loaded with pockets, and I wasn't sure I'd be able to put in that many, but thankfully she didn't want much, just a simple purse with a pocket on the outside. Of course she also wanted a zip top instead of a flap, and not being one afraid of a challenge, I told her "of course I can do that!" Famous last words, let me tell you! But, thankfully my zipper foot & I have become fast friends & I don't curse at it nearly as much as when I started.
This is the first test bag, made with the incredible Shrinky Dink fabric. I picked up the fabric on clearance (hard to pass up 5-yard bolts for $5!) at the Mart of Walls a couple weeks ago, knowing it wasn't going to be high quality, but thinking it would be nice to have on hand for just this sort of thing. When it comes to trying out the patterns in my head, I don't want to take a risk with good fabric & waste it. The first thing in my head when I picked it up was the Origami Imposter bag, which I keep promising I'll get around to doing. No really, I will!
Because I got five yards of each color, I didn't bother washing it since it would be too much of a pain to fold or put back on the bolt. I didn't really expect it to be much of a problem since I'm not making clothes out of this or anything. After I cut out my pattern pieces, they were in desperate need of ironing, and imagine my surprise when it seemed to be shrinking under the iron! I put an ironed piece on top of an unironed one, and sure enough, it had shrunk down almost a 1/4 inch on each side! Since it was just a trial run, I decided to go ahead & iron the rest, trying to get them all the same size, and continued on with the purse.
I decided to edge the front pocket with the same bias tape I'm using for the strap. I figured it would make the bias tape strap seem less out of place and add a bit of contrast. I'm really liking how it turned out & it's a nice size pocket for the outside.

I actually have pink ends on the zipper, but since I basically made it the full width of the purse, they ended up in the side seams so the top doesn't look as nice as it should.

It's hard to tell here, but the "flat" bottom, well, isn't. I have no idea what happened, but my corners just didn't turn out. It's all folded & puckered weird. The only thing I thought was maybe the interfacing & all the layers were just too bulky. Or maybe it's because I tried to do just a 1/2 flat bottom, and maybe it's not enough to really push the corners out.


Same patch pocket on the inside. About 4x3, I may make it a tad bigger in the finished purse. I was thinking this morning it would probably be nice if it were better suited for a cell phone, but I'll check with my friend to see what she wants. She originally said she didn't need a pocket on the inside, so if she still doesn't want one, I'll just leave it out.

The overall dimensions for the finished purse are 9 inches tall, 5 1/2 inches wide (5 1/4 zip opening), 1 1/2 inches deep, and the front pocket comes up 7 inches. I think I'll add an inch or so to the width when I make the next one, mostly so the zip opening will be a bit bigger. This one seemed a little small, though still easily accessible.
So, what do you think? Is this something in which you'd be interested in having a tutorial? Let me know!
Until next time...

This all came about because a friend sent me an e-mail last week that she wanted something similar to this Vera Bradley Mini Hipster purse, but with a few changes. So we played a bit of Twenty Questions (or so it seemed) so I could get a general idea of what she wanted. That Vera Bradley bag is loaded with pockets, and I wasn't sure I'd be able to put in that many, but thankfully she didn't want much, just a simple purse with a pocket on the outside. Of course she also wanted a zip top instead of a flap, and not being one afraid of a challenge, I told her "of course I can do that!" Famous last words, let me tell you! But, thankfully my zipper foot & I have become fast friends & I don't curse at it nearly as much as when I started.
This is the first test bag, made with the incredible Shrinky Dink fabric. I picked up the fabric on clearance (hard to pass up 5-yard bolts for $5!) at the Mart of Walls a couple weeks ago, knowing it wasn't going to be high quality, but thinking it would be nice to have on hand for just this sort of thing. When it comes to trying out the patterns in my head, I don't want to take a risk with good fabric & waste it. The first thing in my head when I picked it up was the Origami Imposter bag, which I keep promising I'll get around to doing. No really, I will!
Because I got five yards of each color, I didn't bother washing it since it would be too much of a pain to fold or put back on the bolt. I didn't really expect it to be much of a problem since I'm not making clothes out of this or anything. After I cut out my pattern pieces, they were in desperate need of ironing, and imagine my surprise when it seemed to be shrinking under the iron! I put an ironed piece on top of an unironed one, and sure enough, it had shrunk down almost a 1/4 inch on each side! Since it was just a trial run, I decided to go ahead & iron the rest, trying to get them all the same size, and continued on with the purse.
I decided to edge the front pocket with the same bias tape I'm using for the strap. I figured it would make the bias tape strap seem less out of place and add a bit of contrast. I'm really liking how it turned out & it's a nice size pocket for the outside.

I actually have pink ends on the zipper, but since I basically made it the full width of the purse, they ended up in the side seams so the top doesn't look as nice as it should.

It's hard to tell here, but the "flat" bottom, well, isn't. I have no idea what happened, but my corners just didn't turn out. It's all folded & puckered weird. The only thing I thought was maybe the interfacing & all the layers were just too bulky. Or maybe it's because I tried to do just a 1/2 flat bottom, and maybe it's not enough to really push the corners out.

I wasn't sure how to attach the straps & they ended up pinched in the middle of the seam. Not happy with how it turned out, just because it puckers all funny. It still hangs alright, just not the prettiest thing in the world.

Simple patch pocket on the inside. You can also tell the how the straps are folded funny. Not very pretty & kind of awkward.

And here's bag #2, made from much better fabric so I could get a better overall idea of the finished size. I still had some issues with the bottom (although it looks MUCH better), so it ended up a little narrower than I wanted. I'll adjust the final purse accordingly so I can get it the right finished size & still have a decent bottom.

The bottom on this one ended up about 1 1/2 inches. I'll cut it down to about 3/4 to an inch for the final purse. At least it actually ended up square on this one! Still can't figure out the problem with the first one. I did notch out the interfacing for this one, so maybe it was just too much bulk the first time.

Zipper top is much better on this one as well. I used the lining fabric for the zip ends & really like the little bit of color in the top. I left more room on the ends of the zipper for the seam than I did in the first one, so it fits much better & looks a lot nicer.

Same patch pocket on the inside. About 4x3, I may make it a tad bigger in the finished purse. I was thinking this morning it would probably be nice if it were better suited for a cell phone, but I'll check with my friend to see what she wants. She originally said she didn't need a pocket on the inside, so if she still doesn't want one, I'll just leave it out.

Much, much better on the straps this time. The come out of the sides at an angle, which even though it hangs a little funny going straight down, when worn across the chest with a long strap, it'll sit nicely on the hip. Also, no weird bulky-ness, which is happy.

The overall dimensions for the finished purse are 9 inches tall, 5 1/2 inches wide (5 1/4 zip opening), 1 1/2 inches deep, and the front pocket comes up 7 inches. I think I'll add an inch or so to the width when I make the next one, mostly so the zip opening will be a bit bigger. This one seemed a little small, though still easily accessible.
So, what do you think? Is this something in which you'd be interested in having a tutorial? Let me know!
Until next time...
Friday, September 24, 2010
Tote Giveaway! (now closed)
Alright, you be the judge, was it worth the wait? I sure hope so!

Now is your chance to win my version of Living With Punks' pillow cover tote. I've made a few of these before, infact this is the project that got me back into sewing this spring. I still love this nice & simple tote, and since I stocked up on the pillow covers while they were on clearance (did I ever mention the half dozen Target stores I visited to get as many as I could? What's that you said, something about being obsessed? Shhh...), I still have a couple more left to make a bag or two.
There are two patch pockets, one each on the outside & inside.


I decided to sew the straps in after I sewed the lining in so it would be a little more sturdy. This means you can see the strap stitching on the inside, but personally I think the boxes & x's are just an added detail to the lining. Plus they actually turned out kinda pretty, so I'm pretty proud of them.
Of course I have to add the obligatory photo of me with the tote so you can get an idea of the size. This time I chose to drag out my "full length" mirror (um...that we bought right after the wedding, a year & a half ago, and is obviously still in the original packaging...) & find someplace better than the Surface of the Sun bathroom to take pictures. Still not a great picture because there isn't exactly the best natural light at ten p.m., and the flash kept screwing up the picture, but you get the idea.
 The straps are a little shorter on this one than on others I've made, but it sits up nice & snug under your arm, which personally I prefer most of the time.
 So, the part you've really been waiting for - what do you have to do to win?! Right? I'm sure that's all you care about.
So here you go: there are two chances to win -
1) Be a follower here & leave me a comment. Go crazy with your comment, tell me something other than the fact that you're a follower. Give me advice. Tell me something crazy about yourself. Tell me what you'd like to see here. Tell me I'm pretty. :) Okay, whatever you want, just leave a comment.
2) Be a Facebook fan/liker/stalker/whatever & leave a comment on the note about the giveaway. Again, go crazy. Be original. Have fun. Or just say hi. Whatever. :)
I'll use a random number generator to pick the winner next Friday. That's right, I'm leaving this open for a full week. I feel bad that it took me so terribly long to finish up the tote for this (I'll be totally honest, I had planned on a completely different item for the giveaway, but it didn't turn out very nice, and I'm happier about this anyways, so it's all better in the end), so I'm going to give everybody plenty of time, especially since I'm just getting around to post this over the weekend when I know a lot of people are away.
Good luck & if all goes well, hopefully we can do this a little more often. :)
Until next time...
Wednesday, September 22, 2010
Blog Roll: Bugaboo, Mini, Mr. & Me
Quick, go check out Kimberly over at Bugaboo, Mini, Mr. & Me. I'll give you a few minutes. Or an hour or two, since I'm pretty sure that might have been how much time I spent over there when I first found her. Just promise me you'll come back. Seriously, I love finding new blogs & getting lost back in the archives, and then wondering what I did before I found them. :)
I'm really loving all the stained glass projects, especially these BOO jars. You just can't go wrong with that sort of thing, and it doesn't hurt that Halloween is my favorite holiday & fall my favorite season for decorating. Which is funny, since it's the season/holiday for which I have the least amount of decorations (..well, compared to my other decorating holidays, which is only Christmas, but you get the idea...). But it's full of my favorite colors, and I always hate having to take down the scarecrows. I'm pretty sure I only took them down last year when it was time to put up the Christmas tree!
Anyways, back to Halloween, how awesome are these podged pumpkins? I especially love the black & white one.
I am just in awe of this finished project. Love, love, love how it comes together and the way it runs through the three hoops. Kimberly's comment about her husband's reaction to it cracked me up too, since my husband says & means the same thing. :)
I have a bunch of random frames I picked up after our wedding and most of them are still sitting up in one of our cabinets because I couldn't figure out how I wanted to hang them all together. I knew I wanted a sort of random-collage type arrangement, and before all our remodeling, I was kind of getting started with a few of them, but I think I like this idea even better.
And while you've over visiting Kimberly's site, make sure you take a look in the upper left-hand corner. Recognize anything?! Imagine my surprise when I got an e-mail this morning from Kimberly that I was being featured on her inspiration board! Thanks again, Kimberly! :)
******
A quick side note - yes, I know I've been totally slacking on the crafting & blogging. And yes, I know I've been making excuses, but that's all they are, and I've decided they're going to stop. Now that the house is getting back in order, and I no longer have a smoking washing machine (YAY!), I'm headed back to my little corner behind the couch. AND, since the weather is cooling off, I'll finally be able to start working on crochet blankets. Unfortunately, that will cut into some of my sewing time, but I'll try to keep things semi-equal, to the best of my abilities. I'm just one woman here!
One more thing, I'm working on the finishing touches of the giveaway bag (that's all the clue you're getting for now!) for the Facebook Fan giveaway I mentioned a couple weeks ago. I hope you'll agree with me that it's been worth the wait. You'll have a couple chances to enter to win, so stay tuned!
Until next time...
Tuesday, September 14, 2010
Crochet Cupcake Pincushion
I haven't sewn much lately (as quickly became apparent the other day), since my sewing machine has been buried behind a mountain of stuff in the living. So between that little barrier (okay, pretty big barrier, it's not like I could even climb over it or anything) and the fact that I had a few requests for some crochet stuff, I've been back to the hook for a week or so.
I'm still sorting out the hair clips that were requested (sorry, Bree!), but when I had a request on the Facebook page (which, by the way, is still two "likers" short of having a give-away! But don't get me started on that...) for a crochet cupcake pincushion, I decided it was definitely a project I could tackle right now.
I'm not including the pattern because I found about a gazillion (really, that's a real number. Only slightly more than a bazillion) patterns, all with only very, very slight variations if there were any at all. So I'll leave that little bit of hard work to you, because if you're like me, you'll also find lots of other fun stuff you'll want to make, and I wouldn't want to deprive you of that. :) But, if I were you, I'd start here. Or here. I'm just sayin.
(Please excuse the really, terrible, horrible photo. It's 11:00 here & I just finished this up a half hour ago. Natural light is hard to come by this time of day. Again, just sayin'. Don't be a hater.)
I'm pretty darn happy with how this turned out. It's stuffed with poly fill, but I put it in (BRAND new & clean, I promise, so please don't freak out) pieces of nylon knee-highs so the filling wouldn't peek or eventually make its way out from between the stitches since it's meant to be poked & prodded. Again, I promise you I used brand-spankin' new nylons, straight from the box. Not my stinky old used ones. I promise. That's gross. :)

Those "sprinkles" are the pins!
It's pretty much "real" sized, about 3 inches tall & 3 inches at the widest point.
Until next time...
Sharing this week over at:
Sunday, September 12, 2010

Scavenger Hunt Sunday: Sept 12
Another scavenger hunt this week, and I almost sat this one out because I was having a hard time deciding what to shoot. I don't think they turned out too bad, but you'll have to excuse the snark. :)
1. Landscape -- Had to go to the archives for this one. Taken in Colorado back in 2008, this is one of my favorite shots from our week out there. Taken with the 35mm SLR, I just can't beat that camera!

2. Powerlines -- Hee.

What?! All our lines are run underground, it makes sense to me! :)
Okay, okay, fine. Is this better? I took this one with my cell phone, looking directly into the sun. I couldn't even see the screen, so I was happy to have a decent picture come out of it.

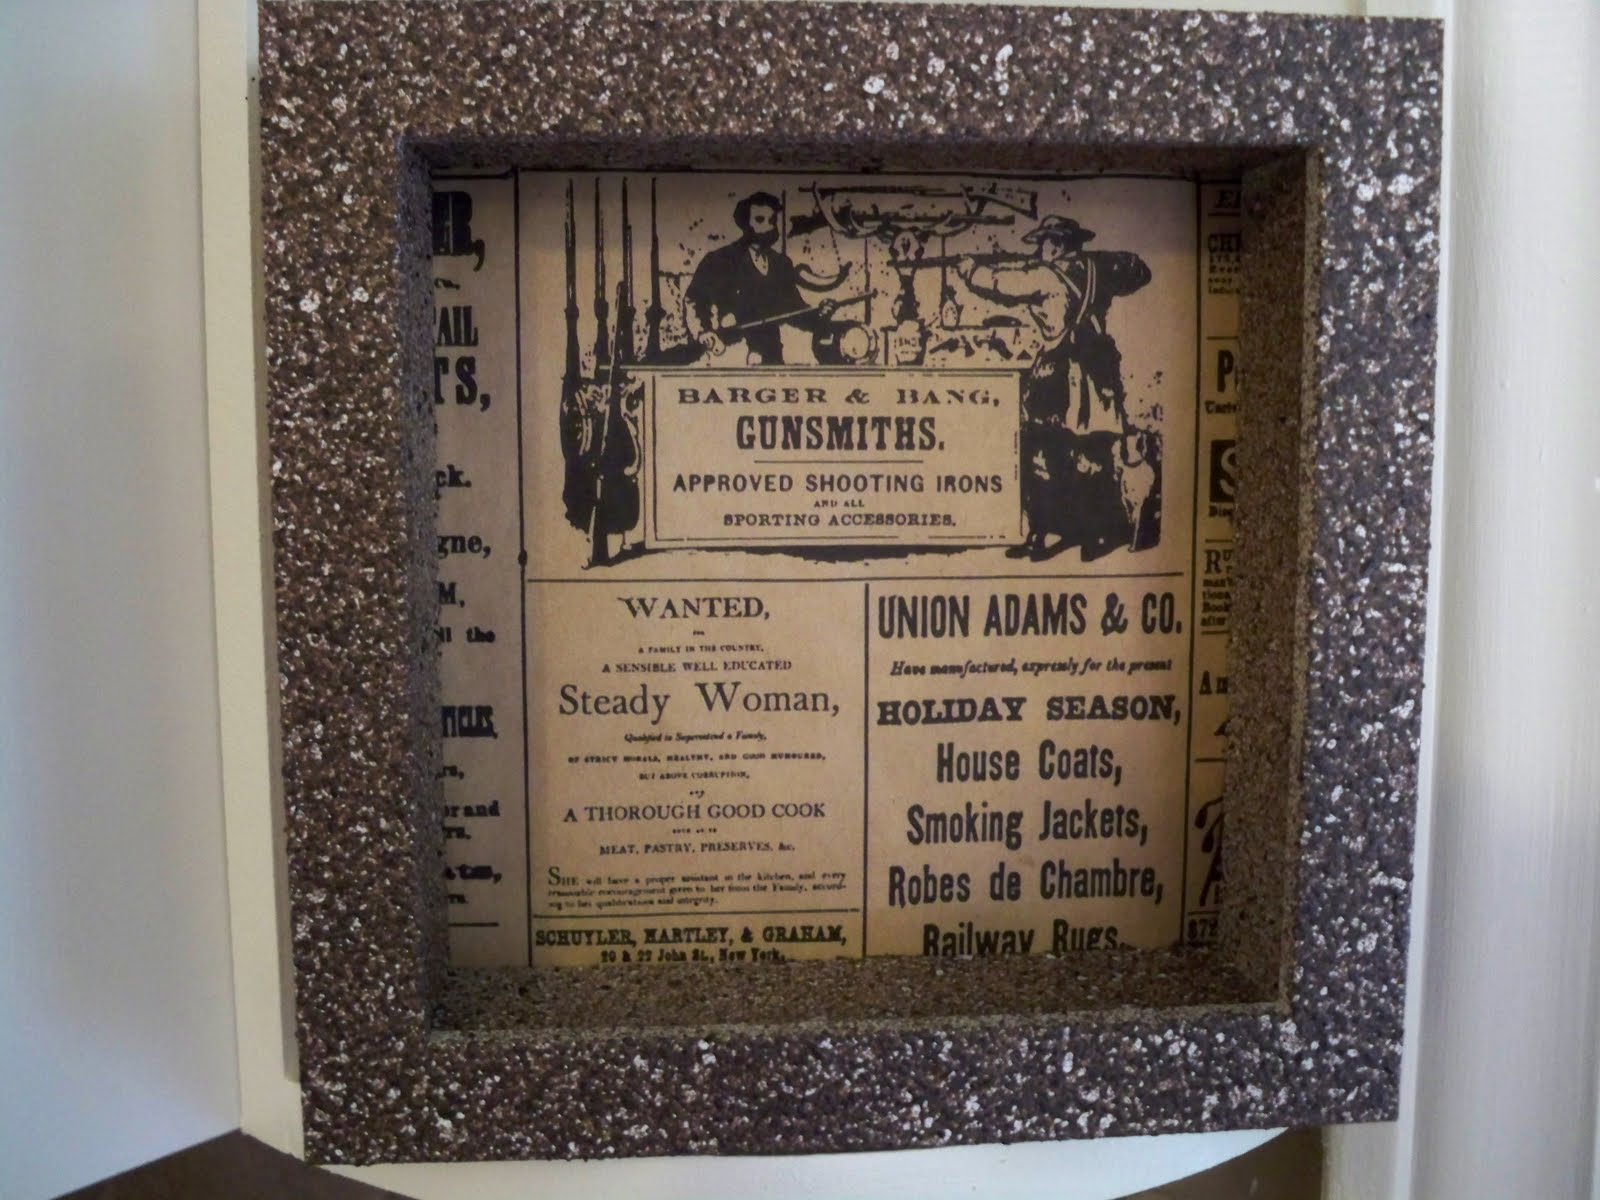
3. Newspaper -- I cut this out of a paper bag that was made to look like an old newspaper ad. I originally picked this particular part because of the Gunsmiths, but thought the "Wanted, Steady Woman, A Thorough Good Cook" part was pretty funny too. The entire ad says, "Wanted for a family in the country, a sensible well educated steady woman, qualified to superintend a family, and a thorough good cook (...) meat, pastry, preserves, etc. She will have a proper assistant in the kitchen, and every reasonable encouragement given to her from the family, according to her qualifications and integrity."
4. Pose -- Hmmm...I know! Quick, Raven, play dead!

Good girl! :)
No, not a good enough pose for you? You're right, she was just dead tired after a nice long walk.
Okay, how about this? I guarantee she didn't enjoy being under that blanket very long, but she was a good girl & listened to Mommy when I told her to just relax & lay still. You can tell she's pouting.

Still not a good enough pose for you? Okay, this is my final try!

If that's not good enough, I don't know what is. :)
5. Hobby -- This is obviously a VERY small portion of my fabric.

I hope you enjoyed my interpretation of this week's scavenger hunt items! Make sure you head over to Ramblings & Photos to check out the rest of this week's pictures.
Until next time...
Wednesday, September 8, 2010
Facebook Fan Giveaway!
When I last checked, My Crafty Crap was sitting with 99 fans/likers/whatever on Facebook, so let's push that up over 100! I'll do a giveaway when it reaches 105. Why 105, you might ask, instead of 100? Ummm...because I feel like it? ;)
So go on, head on over to Facebook & "like" My Crafty Crap. You know you want to. And while we're talking about it, why do you even need to?! You should already be a fan! :)
Details to follow.
Until next time...
Sunday, September 5, 2010
Scavenger Hunt Sunday: Sept 5
This won't necessarily be a weekly thing, but I thought it would be fun to participate in Scavenger Hunt Sunday over at Ramblings & Photos, so here are my contributions for this week!
Let me know what you think!
1. Red -- I actually had kind of a hard time on this one. Part of my problem is I really prefer to shoot with my old 35mm rather than digital (until I can get my hands on a DSLR!), but I don't develop film frequently enough to use a roll for a weekly contest! Granted, I'm sure I wouldn't have had any problems shooting a full roll, but there's no way I would have gotten back in time for Sunday's deadline! For the most part I knew what I wanted to shoot, just didn't know how to accomplish it the way I wanted with the point & shoot rather than SLR. I suppose that's what this is all about though - learning. What a concept! :)

2. Homespace -- Boy, oh, boy, did I have a hard time with this one! I just couldn't decide what I wanted to shoot & didn't have any bright ideas. For a while I was thinking it was "homestyle" (I had written the themes down on a postit & couldn't remember what they were for sure), and my brilliant idea was to go to Arby's & shoot the fries, so I was disappointed when I double-checked the list & realized it wasn't homestyle.

3. Fence -- This is actually an old picture, one taken on the 35mm. It's always been one of my favorites, and even though I've tried to replicate it, I've never been able to. It's hard to be in the right place at the exact moment the sun is shining through the fence. I don't even know how I managed it the first time! The quality on this one isn't the greatest because it was taken back before I was smart enough to get CDs made with the pictures, so I had to scan it.

4. Rock -- I've had this rock for quite a while, I'm pretty sure I found it up in Duluth, MN back in college. When I saw the rock theme I knew immediately I wanted to find a place to put this rock, and decided I liked the contract against the other white rocks the most.

5. Sharp -- Another older photo, but another I couldn't pass up. Although, driving to work this week I did see some thistles that I thought would fit into this theme nicely, but didn't have a chance to stop. I also tried taking a new picture of the barbed wire back behind the fence, but couldn't come up with anything to compare to this one.

Until next time...
Subscribe to:
Posts (Atom)