
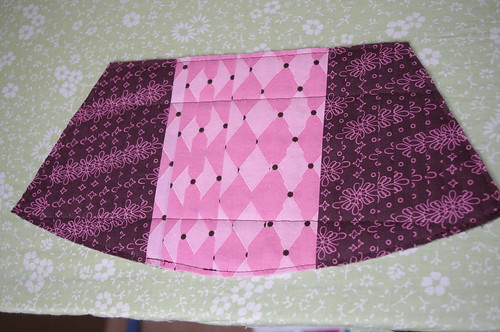
As I said before, I decided to use a few fat quarters pieced together to make my pleats. It worked out perfectly, and as I suspected, three fat quarters sewn together were more than enough length-wise for the small clutch.
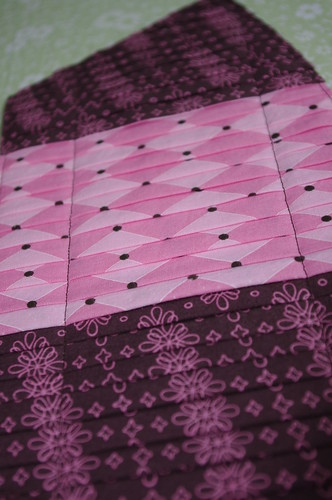
My biggest tip for working on the pleats, especially if you've never done them before (I hadn't!) is to have patience & take your time. As long as you're fabric can handle it (I'm using quilting cotton), use a high temp & lots of steam! It's also easiest to make the next pleat while your fabric is still warm (ummm...okay...hot) from pressing the last pleat. Be careful you don't burn yourself, but try not to let the fabric cool too much between pleats.
Also, I started out working towards myself on the ironing board, but quickly realized that I wouldn't have enough space to pleat the entire piece. I had to turn the piece when it was about 6 inches long, and let me tell you - it's not easy to move a pleated piece of fabric! When I started the second piece, I did about three pleats working towards myself, then turned it lengthwise on the ironing board. It was much easier to get the pleats lined back up & keep working. It really was easiest for me to get it started even while it was facing me, but you can certainly just start out working it lengthwise on the ironing board.
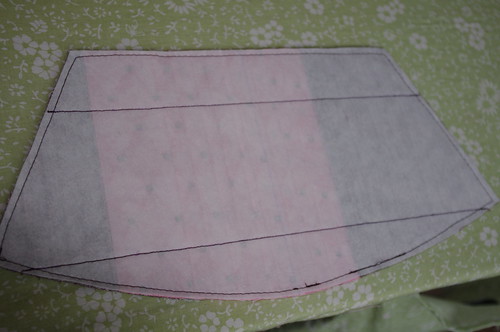
When it comes time to iron on your interfacing (it'll already be cut out from the pattern piece), you'll need to flip the pleated piece over. Like I said before, it's not easy to move pleats, and it's a lot to pin each & every pleat. I used my quilting rulers, sliding one under the pleated fabric & used another on top to flip it over. Then just slide the bottom one back out after you get it flipped.
When you baste the interfacing to the pleated fabric (after you've ironed it into place), make sure you're moving your fabric through your machine with the pleats. After you do one side, you'll want to start new again on the opposite side (don't just stitch all the way around) so you're not working against the pleats. If you do try to sew against the pleats (remember, you'll be sewing on the interfacing side), it's easy for them to get flipped & sewn going the wrong direction. At first I just worked my way around the piece like I normally would, but found some of my pleats getting pushed the wrong direction. When I stopped & flipped it over, more than I had realized had flipped, so I had to rip out part of the seam & resew over those spots. It's all in your seam allowance though, so you won't see any of the basting stitches if they're messy (mine sure are!).
Keep the same thing in mind when sewing your straight lines that will hold down the pleats. I had to start from the same side for both lines, while normally I would have sewn down one line, turned it & came back the opposite direction for the second line.
After you get the pleats sewn down, trim the extra pleated fabric from around the interfacing, then start all over again for your second pleated panel!
Good luck with your pleats, I promise they're much easier than they look once you get the hang of it!
Until next time...
I am loving your fabric this month!
ReplyDeleteThanks for all of your hard work explaining this!
ReplyDeleteIt's really helpful!
Oh Bree, we were two peas in a pod this weekend! I did my pleated panels too! I did pin ever pleat on each side, which I thought made it much easier and then flipping it over was super easy. I also did a few things different. After I ironed on the interfacing, I removed the pins, then went ahead and cut the shape out. Then right side up, basted around the edges, then stitching the two lines to hold everything down. I didn't have any problems with this method at all! I honestly enjoyed the whole process and thought it went WAY easier than I expected it too! I thought this was the "hardest" part of this pattern and am almost finished my clutch already! It is a good feeling!
ReplyDeleteDang, that looks great so far! Although a lot of work. I love love love the fabrics you chose. The middle fabric looks extra cute when pleated.
ReplyDeleteThis was not a project that I was even remotely thinking about tackling. But, I think you've inspired me. :) Thank you!!
ReplyDeleteThanks so much for the tips!! I also have been getting excited about this. I absolutely love how your idea of using a few fat quarters sewn together! I think I am going to steal that idea ;-)
ReplyDeleteNice! So cute to break it up like that too. Your pleats look soooooo good! Ok, off to pleat away :)
ReplyDeleteYour pleats look great, Bree! I love the fabric, too. Thanks for all of the tips in this post... they are sure to come in handy on a future project :)
ReplyDelete