
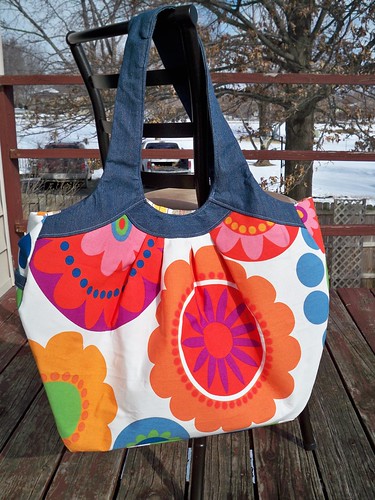
Ahhhh...satisfaction! I was so glad to get this bad boy finished up this weekend, and just about as excited to actually have some sunshine to take a few decent pictures! :)
Let me tell you, this pattern was certainly a test of my patience, and from the comments I'm seeing from those of you who have already completed the bag, I'm sure you'll agree! I'm just hoping the rest of the "easy" patterns in the book are less complicated than this, and I'm now just a little concerned about the later "intermediate," "advanced," and even more so the "experienced" patterns!
I do know from looking through the Flickr album, everybody seems to have successfully conquered the pattern, and there are a ton of really beautiful bags. I love how even with the exact same pattern, we've all created so many different looks, just with our fabric choices.
So, my overall thoughts:
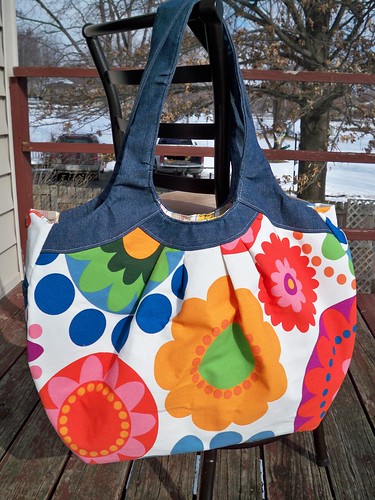
First of all, I mentioned clear back in the beginning that this bag would be perfect for large prints, and I'm glad so many did choose the big prints. Here's the other side of my bag, I purposely chose not to have my two sides match exactly.
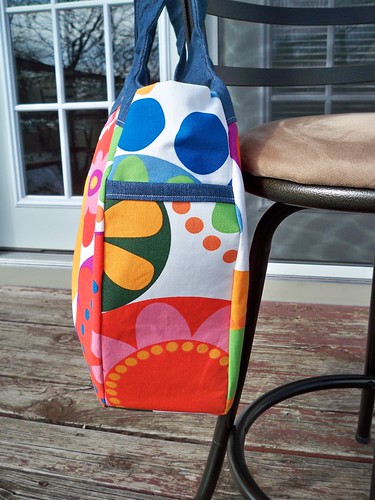
Some people mentioned that the side pockets might be a bit pointless since they're so tall & skinny. I can certainly see where they're not going to be for everybody. I happen to have a tall, skinny water bottle that fits perfectly, so it works for me. Some people modified it by just making the overall pocket shorter, and I saw someone else (sorry, I can't find the picture now!) who just stitched across the pocket half way down. I also like this version with two pockets on the side. I think a shorter pocket would definitely be nice for keeping keys & a cell phone a little more handy.
You can't see it in the pictures, but I chose not to make the handles out of two separate pieces. Instead, I cut the handle pattern with the top of the strap on the fold, and only had to cut out four pieces. I wasn't fond of the idea of having a seam in my handle (and therefore a weak spot) and honestly didn't really see a reason for it. My handles worked out fine, I had one less seam to try to topstitch over, and I love the look of the one-piece handles.
The pattern didn't call for any top stitching on the contrasting band of the side pocket (which came up in the Flickr discussion), but I went ahead & added it. It helped hold the two layers of the pocket together at the top, and I thought it would look nice to match the top stitching on the bands & handles.
The interior pockets are huge, and I wanted some smaller pockets to keep track of smaller stuff. I had mentioned before that I was planning to do all the large pockets as called for in the pattern & add a couple small ones, but instead I opted for the large pockets on one side only, and added a smaller patch pocket on the other side.
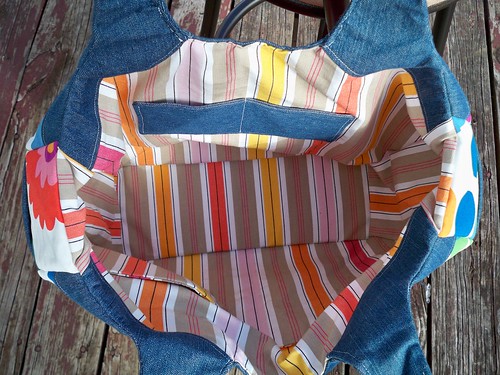
I did add two pieces of craft foam board into the bottom of the bag to help give it extra strength. I just cut two pieces slightly smaller than the bottom panel (they ended up being 5" x 14") & put them in before I stitched up the inside of the handles. Then, to keep it in place, I stitched the lining to the bag along the seams (unfortunately, after the above picture was taken). I did this for the first time with the WOZ bag, and really like how much better everything stayed in place after the lining was stitched in. No more shifting lining, and on such a big bag, it helps a ton. It's not overly hard to do, just a bit time-consuming.
You'll probably notice I didn't add the button & loop closure. Honestly, it's partly because I just didn't feel like it. I had decided early on that I didn't want to add it (even though I think it's a cute feature), and considered adding a magnetic snap instead. Then, in the end, I decided it wasn't flopping open too much, and if it were stuffed full, I probably wouldn't be trying to secure it close anyways since it'll most likely be used as an overnight or beach bag.
Overall, I'm really happy with how the bag turned out, despite some of the frustrations in the construction. I'm not sure it'll go on my to-do list to make again anytime soon, but that's more because I don't really have a need for such large bags. I do think it's a decent pattern to have in my collection though, in case someone should request a large bag.
I'm excited to start working on the Reversible Everyday Shopper for February, it looks like it will be much easier!
Until next time...
You bag is sooo cute! I love that you changed up the pockets a bit - and I love the fabric you used!
ReplyDeleteI didn't get one done - I'm bummed! But I'll play catch up and do it soon. This is such a fun sew-along!
What great fabric choices! I especially like the denim accents. I was feeling really guilty about not even starting on the bag yet (got sidetracked making the baby jacket) but after reading about your struggles with the pattern maybe that's for the best. This way I can learn from everyone else's trial and error if/when I do get around to trying it for myself. I promise I'm on board next month and it does look much, much easier than the Cosmo Bag.
ReplyDeleteI love your bag! I really wish I hadn't added the button and loop closure, as I don't ever think I will use it. I have already filled it with diapers, wipes, toys and other toddler accessories. I also don't think I will be making this bag again. It took FOREVER!
ReplyDeleteYour bag looks fab! It's cool to see how it looks in this fabric as I had thought about using this before I settled on Gunilla. This was a tough pattern and I hope that the ones that follow are less complicated :)
ReplyDeleteGreat job! I like the denim handles, and cutting them in one piece is a great idea. Nice pocket variations, too.
ReplyDeleteI will have to wait a while before attempting this bag again, if I ever do. But... I made a smaller version this time. By next year I might be ready to replace my old beach bag. Maybe a simpler, unlined version, out of home dec fabric for that? First, though, eleven more projects in the book to get through...
Cute, love the denim, pocket variation, and outside pics! I used decorator fabrics and so I got to skip the tons of interfacing. I'm not sure how beginner it is but I did fine. I'm more of a picture girl and less words! This bag is huge! I would love a smaller version.
ReplyDeleteYour bag came out great Bree! I love it, and the stripes look fantastic up against the bold print.
ReplyDeleteWow!!! Awesome, that is one of the best large-print fabrics I have ever seen! What a great choice, and your bag turned out wonderful! I like how you did the pockets, too!
ReplyDeleteHello friend,
ReplyDeleteWow so beautiful! The bag is offered in all the hottest colours, making it a must have for fall! Thank you...
Beach Bag
It's a really nice bag. I have a great thrift shop find of a summer dress in this sort of patterned fabric. I always intended to make it into a beach bag. Now I've seen your bag, I know it is the right choice, I just need to kick myself up the backside and get started on it.
ReplyDelete